728x90
우선 모든 위젯의 생성은 객체 형태로 선언 되지만 Dart언어의 특성상 new라는 예약어의 생략이 가능하여 그렇게 보이지 않을 뿐 착각하면 안된다.
예를들면 아래 코드에서 MaterialApp()이라고 자성되어 있지만,
new를 생략하여 안보일뿐 객체를 return하는 것
마찬가지로 MaterialApp()안에 home이라는 매개변수에 Scaffold()라는 객체를 new라는 예약어 사용 없이 객체를 생성하고 대입하는 방법
return MaterialApp(
	home : Scaffold(
		...
	)
)
해당 과정이 중요하고 간과하면 안된다.
대부분의 매개변수는 Null이 허용되며, 디폴트값이 정해져 있다.
VScode의 경우 호버로 객체의 생성자의 매개변수를 볼 수 있고,
IntelliJ에서는 Command+K와 Command+I를 연속해서 입력하여 해당 정보를 찾아 볼 수 있다.
Header
Scaffold
- view화면의 골격
children
- Widget을 선언하는 객체
- children은 List형식으로 Widget 데이터 타입
ex) List<Widget> children
chileren : [
	Column(
		Text(
			"bla~ bla~"
		),
	),
],
child
- Widget을 선언하는 객체
- child는 하나의 객체만을 가진다.
ex) Widget child
child: Text(
	"Hello World!",
	color: Colors.red,
),
Row
- DB의 row라고 생각하면 편함
- Row안의 children안의 Widget의 갯수가 증가하면 가로로 데이터가 생김
- Row가 증가하게 되면 세로로 한칸씩 생김
- Row의 MainAxis(수평)은 가로 CrossAxis(교차)는 세로
Column
- DB의 column이라고 생각하면 편함
- Column안의 children안의 Widget의 갯수가 증가하면 세로로 데이터가 생김
- Column이 증가하게 되면 가로로 한칸씩 생김
- Column의 MainAxis(수평)은 세로 CrossAixs(교차)는 가로
SizedBox
- 특정 사이즈의 박스를 만들어주는 객체
Color
- 색깔을 넣는 방법은 다양함
- Colors.”색상”
- Color(0xFF??????) 16진법으로 색상 표기
- Color.fromARGB(255, ?, ?, ?) RGB로 색상 표기
- Color.fromRGBO(?, ?, ?, ?) Opacity(마지막 매개 변수)를 사용할 수 있는 RGB로 색상 표기
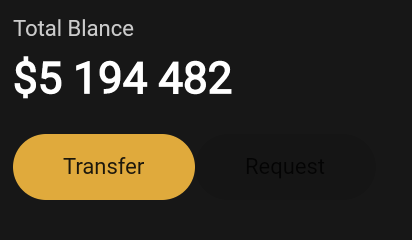
Buttons Section
Container
- HTML태그의 div와 비슷함
- decoration을 통해 UI를 변경할 수 있음
Container(
	decoration: BoxDecoration(
		borderRadius: BorderRadius.circular(45),
		color: Color(0xFFF2B33A),
	),
	child: Padding(
		padding: EdgeInsets.symmetric(
		vertical: 20,
		horizontal: 50,
	),
	child: Text(
		"Transfer",
		style: TextStyle(fontSize: 22),
	),
),
Code Actions
Warp
- Warp in “~~” 클릭하면 hover하고 있는 위치의 안에 있는 객체들이 “~~”객체 안에 삽입된다.
- Remove this widget을 클릭하면 해당 위젯을 제거하고 안에있던 객체들이 밖으로 나오게 된다.

Reuseable Widgets
Extract Widget
- 만들어논 Widget을 메서드화 하여 재사용할 수 있도록 만듬
- 달라지는 부분 ex)Text, TextColor, BackgroundColor 등 은 변수를 만들어 설정하고 생성자를 통해 변환해줄 수 있다.
- VScode는 Command + .(dot)을 통해 토글을 open할 수 있다.
- IntelliJ의 경우 2가지 방법이 있음
- Command + option + m 을 눌러 IntelliJ자체 Extract Method를 생성하는 방법
- Command + option + w 를 눌러 Flutter 기능으로 Extract Method를 생성하는 방법
- 하지만, 왜인지 내 키보드에서는 먹지를 않아 커멘드를 Command + control + w 로 변경
Constructor
- .dart파일을 생성하여 Class를 만들어 주는 방식으로 사용할 수도 있음
ex) Button.dart 파일을 생성하여 Button class를 생성
import 'package:flutter/material.dart';

class Button extends StatelessWidget {
  final String text;
  final Color bgColor;
  final Color textColor;

  const Button({
    super.key,
    required this.text,
    required this.bgColor,
    required this.textColor,
  });

  @override
  Widget build(BuildContext context) {
    return Container(
      decoration: BoxDecoration(
        borderRadius: BorderRadius.circular(45),
        color: bgColor,
      ),
      child: Padding(
        padding: EdgeInsets.symmetric(
          vertical: 20,
          horizontal: 50,
        ),
        child: Text(
          text,
          style: TextStyle(fontSize: 22, color: textColor),
        ),
      ),
    );
  }
}
다음과 같이 객체를 생성하여 사용
Row(
	mainAxisAlignment: MainAxisAlignment.spaceBetween,
	children: [
		Button(
			text: "Transfer",
			bgColor: Color(0xFFF2B33A),
			textColor: Colors.black
		),
		Button(
			text: "Request",
			bgColor: Color(0xFF1F2123),
			textColor: Colors.white
		),
	],
),
Card
- Button을 응용하여 생성
Icons and Transforms
Icon
- Icon객체를 생성하여 Icons.””로 SDK내에 있는 아이콘을 사용할 수 있고, 다운받아서 사용할 수도 있다.
Icon(
	Icons.euro_rounded,
	color : Colors.white,
	size : 88,
),
Transforms
- Transform객체를 생성 Transform.””로 해당 child만 어떻게 변형을 줄 건지 선택하여 사용
Transform.scale(
	scale : 2.2,
	child : Transform.translate(
		offset : Offset(-5, 15)  //dx, dy
		child : Icon(
			Icons.euro_rounded,
			color : Colors.white,
			size : 88,
		)
	)
)
Clip clipBehavior
- Clip.””로 card를 overflow 하는 부분을 처리
clipBehavior: Clip.hardEdge,
Reuseable Icons
- 위에 있는 Reuseable Widgets과 같은 방법으로 사용
import 'package:flutter/material.dart';

class CurrencyCard extends StatelessWidget {
  final String name, code, amount;
  final IconData icon;
  final bool isInverted;

  final _blackColor = Color(0xFF1F2123);

  CurrencyCard({
    super.key,
    required this.name,
    required this.code,
    required this.amount,
    required this.icon,
    required this.isInverted, //색 반전이 필요한지 여부 결정 필요하면 true
  });

  @override
  Widget build(BuildContext context) {
    return Container(
      clipBehavior: Clip.hardEdge,
      decoration: BoxDecoration(
        color: isInverted ? Colors.white : _blackColor,
        borderRadius: BorderRadius.circular(25),
      ),
      child: Padding(
        padding: const EdgeInsets.all(30),
        child: Row(
          mainAxisAlignment: MainAxisAlignment.spaceBetween,
          children: [
            Column(
              crossAxisAlignment: CrossAxisAlignment.start,
              children: [
                Text(
                  name,
                  style: TextStyle(
                    color: isInverted ? _blackColor : Colors.white,
                    fontSize: 32,
                    fontWeight: FontWeight.w600,
                  ),
                ),
                SizedBox(
                  height: 10,
                ),
                Row(
                  crossAxisAlignment: CrossAxisAlignment.end,
                  children: [
                    Text(
                      amount,
                      style: TextStyle(
                        color: isInverted ? _blackColor : Colors.white,
                        fontSize: 20,
                      ),
                    ),
                    SizedBox(
                      width: 5,
                    ),
                    Text(
                      code,
                      style: TextStyle(
                        color: isInverted
                            ? _blackColor.withOpacity(0.8)
                            : Colors.white.withOpacity(0.8),
                      ),
                    ),
                  ],
                ),
              ],
            ),
            Transform.scale(
              scale: 2.2,
              child: Transform.translate(
                offset: Offset(
                  -5,
                  10,
                ),
                child: Icon(
                  icon,
                  color: isInverted ? _blackColor : Colors.white,
                  size: 88,
                ),
              ),
            ),
          ],
        ),
      ),
    );
  }
}
CurrencyCard(
name: "EURO",
code: "EUR",
amount: '6 428',
icon: Icons.euro_rounded,
isInverted: false,
),
Transform.translate(
offset: Offset(0, -40),
child: CurrencyCard(
name: "Bitcoin",
code: "BTC",
amount: "9 785",
icon: Icons.currency_bitcoin,
isInverted: true,
),
),
Transform.translate(
offset: Offset(0, -80),
child: CurrencyCard(
name: "Dallor",
code: "USD",
amount: '428',
icon: Icons.attach_money,
isInverted: false,
),
),
SingleChildScrollView
- 스크롤을 사용 할 수 있도록 해주는 객체
body: SingleChildScrollView(
	...
)
Uploaded by N2T
728x90
반응형
'FrameWorks > Flutter' 카테고리의 다른 글
| 3. Stateful Widgets (0) | 2023.04.24 |
|---|---|
| 1. Hello Flutter (0) | 2023.04.10 |
| Flutter?? (0) | 2023.04.10 |
| [Flutter] 객체 생성시 Const를 붙이라는 Warning 제거 (0) | 2023.04.09 |

댓글